How to Combine Multiple ID Photos into One Print Layout
Have you ever needed several copies of the same ID photo but didn’t want to waste paper or spend extra on prints? Combining multiple ID photos into one print layout is a smart, efficient solution. It saves time, cuts costs, and lets you organize your photos neatly. Imagine you have a passport photo and you want five identical prints. Instead of printing one photo five times, you can arrange all five in a single layout and print them once. Simple, right? Let’s dive into how you can do this easily, even if you’re not a Photoshop wizard!
Understanding the Basics of ID Photo Layouts
Before diving into the tools and techniques for combining multiple ID photos into one print layout, it’s important to first understand what exactly a print layout is and why it matters. A print layout, in simple terms, is the arrangement of multiple images on a single page in a way that is optimized for printing. When dealing with ID photos, this means placing several copies of the same photo, or different photos, neatly on one sheet of paper so that you can print them all at once. This not only saves paper and ink but also streamlines the process of producing multiple identical photos quickly.
ID photos are not just any pictures; they have specific size requirements that vary depending on their purpose—passport photos, visa photos, or driver’s licenses all come with standardized dimensions. For example, the classic U.S. passport photo is typically 2 inches by 2 inches. This standardization is crucial because if the photos don’t meet the exact size guidelines, they could be rejected by authorities, making the entire exercise pointless. So, when creating a print layout, maintaining these precise dimensions for each photo is a must.
The main challenge when designing a print layout for ID photos is to fit as many photos as possible onto a single page without sacrificing quality. This is where a careful balance comes in. If the photos are squeezed too tightly or resized improperly, the print quality may suffer, resulting in blurry or distorted images that won’t be acceptable. On the other hand, if too much empty space is left between photos, you waste paper and resources. An effective layout maximizes the use of space while preserving the clarity and integrity of each individual photo.
In addition to size and quantity, consideration must also be given to margins and cutting space. Since you’ll usually need to cut out each individual photo after printing, leaving enough margin between the images is essential to avoid cutting into the photo itself. Proper margins ensure that each photo can be separated cleanly and precisely. Understanding these basic principles of print layout sets a solid foundation before moving on to specific software tools or techniques to create your own ID photo sheets efficiently and professionally.
Common ID Photo Sizes and Their Importance
Every country or institution sets its own requirements for ID photo sizes, so understanding these dimensions is essential before you combine multiple photos into one print layout. If the size or resolution isn’t right, your photos can end up blurry, pixelated, or improperly cropped, making them unusable. Here’s a detailed list of common ID photo sizes and why each matters:
- S. Passport Photo
- Dimensions: 2 inches by 2 inches
- Pixels at 300 DPI: 600 x 600
- Importance: This is one of the most standardized and strictly regulated ID photo sizes. The square format ensures your face fits perfectly into government forms. Any deviation can cause your passport application to be rejected.
- Visa Photo (Common International Size)
- Dimensions: 35 mm by 45 mm (approximately 1.38 x 1.77 inches)
- Pixels at 300 DPI: 413 x 531
- Importance: Many countries require this rectangular size for visa applications. It demands precise cropping and correct head positioning. Layouts must respect this ratio to avoid cutting off parts of the image.
- Driver’s License Photo
- Dimensions: Varies widely by region or state
- Pixels at 300 DPI: Varies accordingly
- Importance: Since driver’s license photos differ greatly in size and aspect ratio, you need to check local specifications before preparing print layouts. Incorrect sizing risks rejection or poor quality prints.
- School ID Photo
- Dimensions: Varies depending on school policies
- Pixels at 300 DPI: Varies accordingly
- Importance: School IDs come in multiple shapes and sizes. Some schools prefer smaller photos, others larger. Matching the exact size is necessary to maintain quality and meet school requirements.
- Employment ID Photo
- Dimensions: Commonly 1.5 x 2 inches or 2 x 2 inches
- Pixels at 300 DPI: Approximately 450 x 600 or 600 x 600
- Importance: Corporate ID badges may use varying photo sizes depending on badge design. Ensuring the photo fits the badge frame without distortion is crucial.
- Government-issued ID Cards
- Dimensions: Usually around 1.5 x 1.5 inches or rectangular variations
- Pixels at 300 DPI: Around 450 x 450 pixels or matching the rectangle size
- Importance: Precise sizing guarantees the ID’s authenticity and helps avoid issues with scanning or verification systems.
- Student Visa or University ID Photos
- Dimensions: Often 35 mm x 45 mm or 2 x 2 inches
- Pixels at 300 DPI: 413 x 531 or 600 x 600
- Importance: Universities and student visa programs usually have strict size and background color requirements; these must be respected in print layouts.
Tools You Can Use to Combine ID Photos
| Tool Name | Type | Key Features | Pros | Cons |
| Microsoft Word / Google Docs | Word Processor | Easy drag-and-drop, basic image resizing, simple layout | No software installation needed, widely accessible | Limited precision in photo editing and layout; can be clunky for fine adjustments |
| Paint.NET | Free Graphic Editor | Simple interface, basic image editing, layering support | Free to use, beginner-friendly, lightweight | Limited advanced features, less flexible than professional tools |
| Adobe Photoshop | Professional Editor | Advanced editing, precise resizing, layering, guides, grid alignment | Ultimate flexibility and control, professional quality output | Paid software, steep learning curve |
| Canva | Online Design Tool | Drag-and-drop editor, pre-made templates, grid layouts | User-friendly, no installation required, good for quick layouts | Requires internet connection, limited advanced editing features |
| Specialized ID Photo Apps | Mobile/Desktop Apps | Automatic sizing, print layout templates, passport/visa-specific formats | Easy and fast, built specifically for ID photos | Often limited customization, may require payment for full features |
Step-by-Step Guide to Create a Print Layout for ID Photos
Creating a print layout for ID photos may sound complicated, but when broken down into clear steps, it becomes a manageable and even enjoyable task. The first and most important step is to know your photo size. Different ID types have specific dimensions that must be followed precisely. Checking official guidelines ensures your photos meet all requirements and will be accepted by authorities. Without this, the entire effort could be wasted due to incorrect sizing or formatting.
Once you have the correct dimensions, the next step is to prepare your photos. This means cropping and resizing them to the exact size required, while maintaining a high resolution of 300 dots per inch (DPI) to guarantee sharp, clear prints. Skipping this step or working with low-resolution images will result in blurry or pixelated photos. This preparation is essential before moving to any layout creation, as it forms the foundation for a professional-looking final product.
Choosing the right software or tool to create your print layout depends on your comfort level and the resources available to you. You can opt for simple programs like Microsoft Word or Google Docs if you want an accessible option without installing anything. For more control and precision, Adobe Photoshop or specialized online tools offer advanced features such as grid alignment and margin control. The key is to pick the tool that best fits your skill level and project requirements.
With your photos ready and software chosen, you then create a new canvas or document sized exactly to match your print paper, such as 4×6 or 5×7 inches. You insert multiple copies of your ID photo into the document and arrange them neatly in rows and columns. It’s important to adjust the spacing and margins so there’s enough room between photos for cutting without damaging the edges. Finally, save your layout in a print-friendly format like PDF or high-resolution JPEG. When you print on quality photo paper and carefully cut along the margins, you’ll have a set of professional, ready-to-use ID photos all printed on one efficient sheet.
How Many Photos Can Fit on One Page?
- When printing multiple ID photos on a single sheet, the total number depends on the size of the paper and the dimensions of each photo.
- For a standard photo size of 2 x 2 inches, a 4 x 6 inch print layout can accommodate about 6 photos on one page.
- This layout generally arranges the photos in two rows with three photos per row, leaving enough margin between photos for cutting without damage.
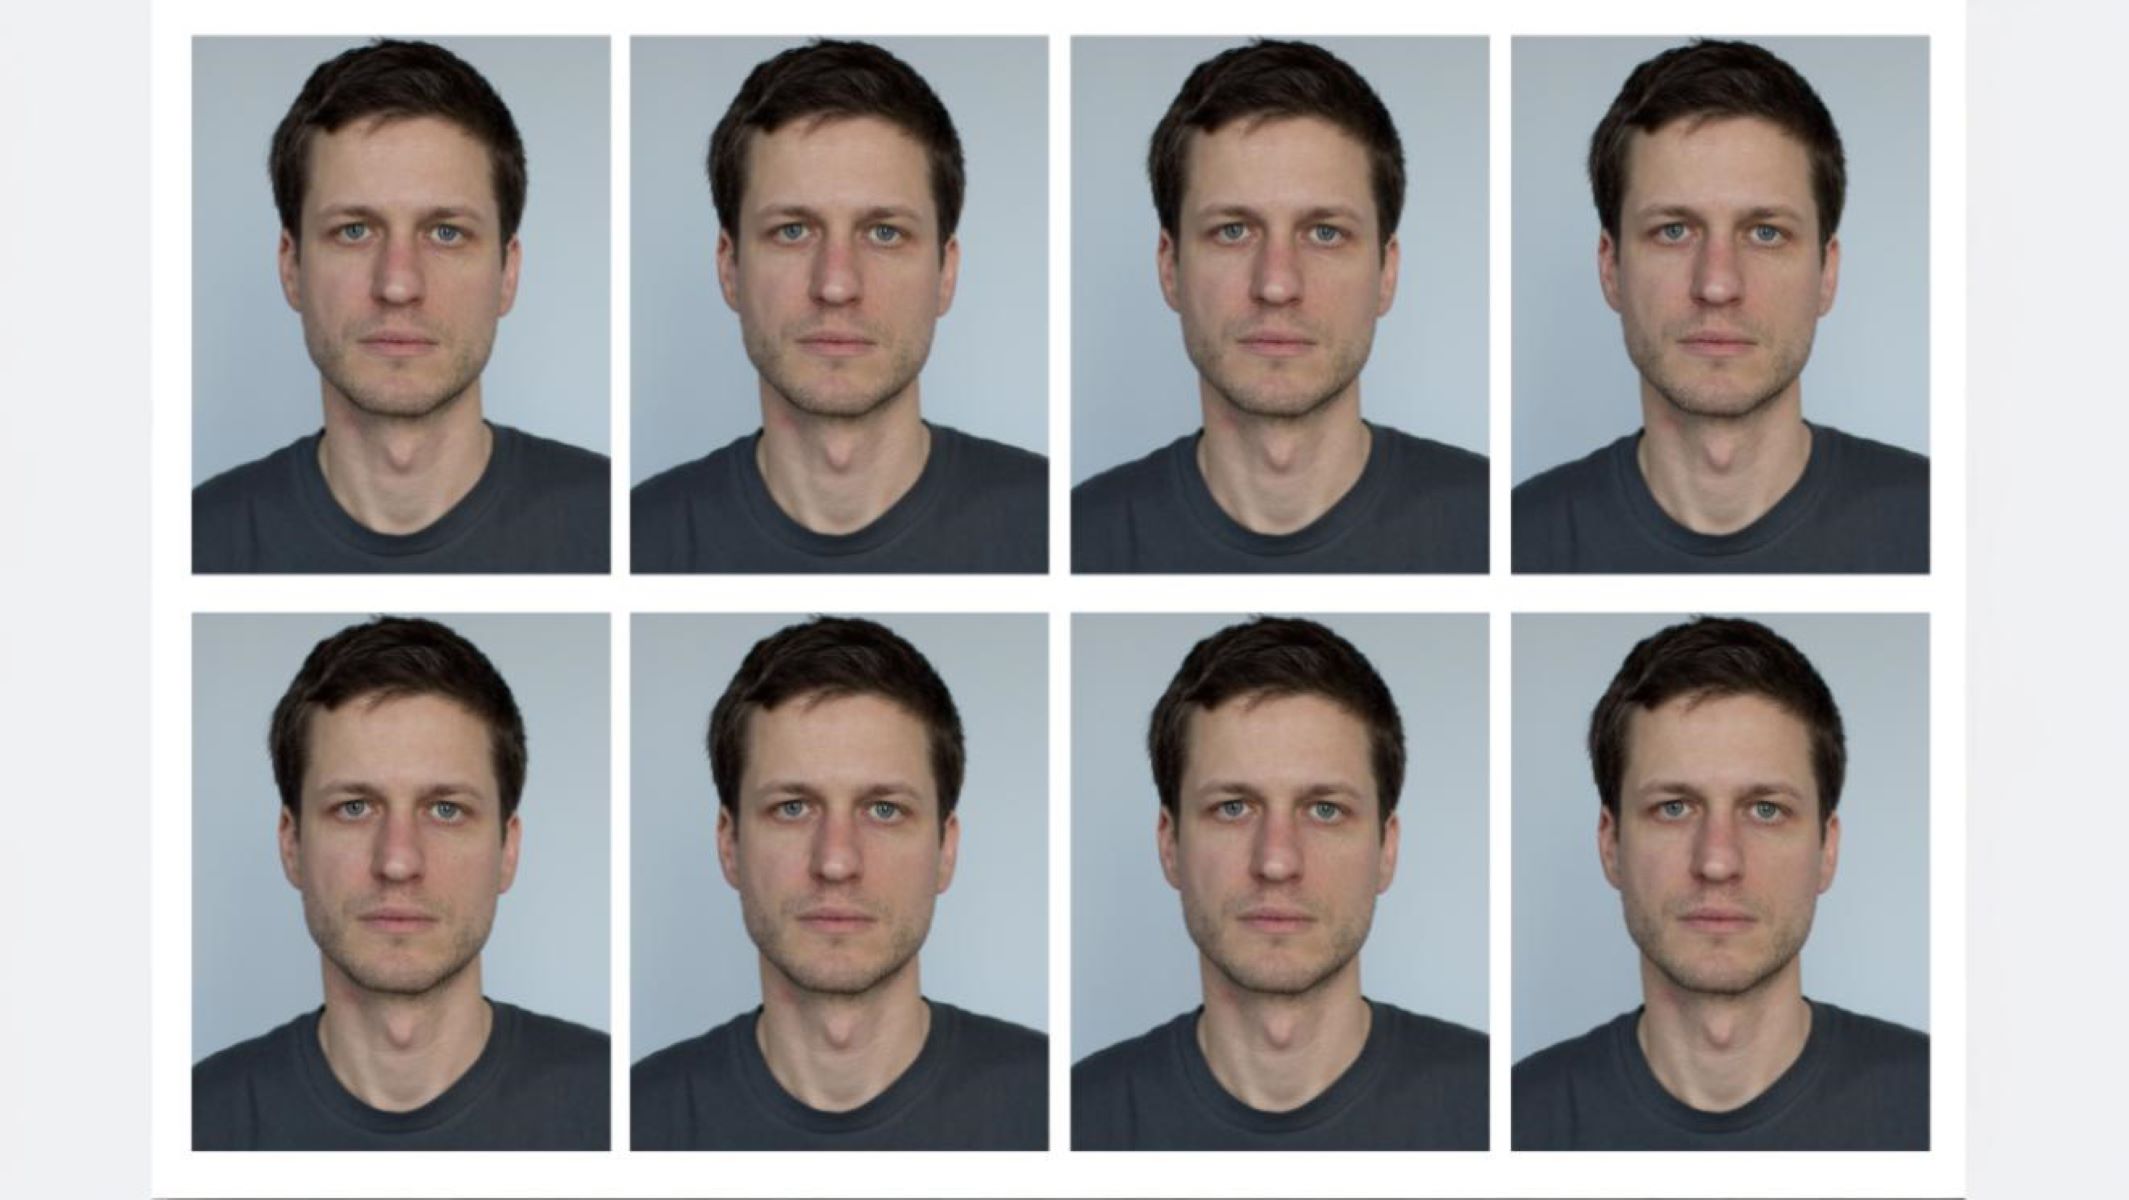
- Increasing the print paper size to 5 x 7 inches allows fitting roughly 8 photos of 2 x 2 inches each.
- In this case, the photos are usually arranged in two rows with four photos in each row, with sufficient spacing for clean cuts.
- Using an 8.5 x 11 inch (letter size) paper, you can fit up to 20 photos sized 2 x 2 inches on one page.
- These photos are typically organized in a grid of four rows and five photos per row to maximize space while maintaining margins.
- The exact number can vary slightly depending on the margin size left for cutting and the specific printer’s printable area.
- Margins are important because they prevent photos from being cut into or overlapping, ensuring each photo stays intact after printing.
- Layouts are usually designed in a grid format to optimize space and make it easier to separate photos once printed.
- If the photo size changes (e.g., smaller or larger than 2 x 2 inches), the number of photos fitting on one page will adjust accordingly.
- For example, smaller photos can be arranged in greater quantities per page, while larger photos reduce the total count.
- Some printing software allows you to customize margins and spacing to find the best balance between quantity and ease of cutting.
- Efficient use of paper helps reduce waste and printing costs, especially when multiple copies are needed.
- Knowing how many photos fit on your chosen paper size helps you plan printing jobs better and saves time in setting up layouts.
Tips to Ensure High-Quality Prints
| Tip | Explanation | Why It Matters | Recommended Practice | Common Mistake to Avoid |
| Work in 300 DPI or Higher | Ensures images have enough resolution for clear, sharp prints | Low DPI causes pixelation and blurry photos | Set your canvas and photos to 300 DPI or above before printing | Using low-resolution images (72 or 150 DPI) |
| Avoid Stretching or Distorting | Maintain original aspect ratio when resizing photos | Stretching distorts faces and details, ruining photo quality | Use proportionate scaling tools in editing software | Dragging corners freely without holding shift or aspect lock |
| Use Lossless Formats (PNG, TIFF) | Save photos in formats that do not compress or degrade image quality | Prevents loss of details that happen with compressed formats like JPEG | Export photos as PNG or TIFF for print-ready files | Saving repeatedly as JPEG, which loses quality over time |
| Print on Quality Photo Paper | Use paper designed specifically for photo printing | Better color reproduction, sharper images, and durability | Purchase glossy, matte, or satin photo paper suitable for your printer | Using regular printer or copy paper for photos |
| Calibrate Your Printer | Adjust printer settings and colors to match your monitor | Ensures colors print accurately and consistently | Use printer calibration tools or color profiles | Printing without color adjustment, resulting in off-color photos |
Why Not Just Use ID Photo Printing Services?
When it comes to getting your ID photos printed, many people automatically think of professional photo printing services. These services certainly offer convenience; you simply go to a shop or send your photos online, and they handle the rest. For one or two photos, this might seem like the easiest option. However, relying solely on professional printing services can quickly become expensive, especially if you need multiple copies or several sets of photos. Each print might come with a fixed price, and additional prints usually add up. This is where printing your own ID photos at home or in your office can be a smarter choice.
Printing your own ID photos saves not only money but also time. You don’t have to schedule appointments, wait in queues, or send files off and wait for delivery. With a good home printer and proper software, you can prepare your layout and print multiple copies instantly whenever you need them. This immediacy is a major advantage, especially when you have last-minute requirements or need to update your documents quickly. Being in control of the printing process allows you to fix mistakes immediately and reprint as necessary without any hassle.
Moreover, printing photos yourself gives you full control over quality and layout. When you use a printing service, you have to trust that their equipment and technicians will produce your photos exactly as you want. Sometimes, colors might be off, cropping might not be perfect, or the paper quality might be disappointing. By managing the process yourself, you can select the best photo paper, choose the ideal resolution, and arrange the photos precisely according to your needs. This level of control ensures that your ID photos meet all specifications and look professional.
Finally, printing at home or your preferred location lets you experiment with different formats and photo arrangements. You can customize how many photos fit on one page, adjust margins for easy cutting, or even try various sizes for different ID types. This flexibility isn’t always available through printing services, which often follow rigid templates. By taking charge of the entire printing process, you save money, gain convenience, and produce high-quality photos that perfectly fit your requirements—all without the wait or uncertainty that sometimes comes with professional services.